Partial application vs currying

Here’s a quick explanation of the difference between currying and partial application.

For a one- or two-argument functions there is little to none difference. But for function with multiple arguments…

Say you have a function f(a1, a2, a3, a4) (it does not really matter what it returns or what the arguments are):

  • currying it will give you a function of one argument, which will return a function of one argument (and so on and so forth), calling which (the last one-argument function) will give you same result as calling the original function f with all the arguments of single-argument functions passed at once (curried): curry(f) = f1(x1) => f2(x2) => f3(x3) => f4(x4) === f(x1, x2, x3, x4)

  • partially applying a function to some N values will give you a function of smaller amount of arguments, where the first N arguments are already defined: papply(f, 1, 17) => f1(x3, x4) === f(1, 17, x3, x4)

In Javascript, the two could be implemented like this:

function curry(f) {
    function curry(f) {
    const currySub = function (fn, args) {
        // Surprisingly, `fn.length` returns the number of arguments of a function `fn`
        if (args.length < fn.length) {
            return function (x) {
                return currySub(fn, args.concat([ x ]));
            };
        }

        return f.apply(null, args);
    }

    return currySub(f, []);
}

function papply() {
    const f = arguments[0];
    const args0 = Array.from(arguments).slice(1);

    return function () {
        const args1 = Array.from(arguments);

        const args = args0.concat(args1);

        return f.apply(null, args);
    }
}

Type casts in C++, explained

As explained by my colleague, former professional C++ developer (now writes schwifty Java). Below is a quick explanation of four basic C++ type casts. Just for the matter of shorter post, consider each cast taking a template type T and a parameter value v like this: const_cast<T>(v).

  • const_cast - removes the const from the type of v (think of casting const char* will produce char*)
  • static_cast - C-style, unchecked explicit type casting (just like in old 90s: (int) 3.14)
  • reinterpret_cast - hard low-level treating a block of memory as type T, no matter what resides in that memory
  • dynamic_cast - does the runtime checks of param type and template type

Game development with Newton Game Dynamics and Irrlicht tutorial

Slowpoke image

As there was not a high load on my tutorial on game development with Irrlicht and Newton Game Dynamics engines as a separate site, I have decided to merge them with my blog and proceed with occasional updates to both as a whole.

So far, these are the changes to the tutorial in comparison to what it used to be (long time ago):

  • moved all the build instructions to CMake
  • added scripting with Lua
  • upgraded the whole tutorial to match latest Irrlicht and Newton versions
  • added chapter on modelling with Blender

The things which are already done (just not published yet), in progress and the future plans for this tutorial include:

  • comparison of different build systems for C++ (including CMake, Bazel and Buck)
  • a better approach to application architecture (plus the comparison of different scripting languages - AngelScript, Squirrel, Lua, ChaiScript and Python)
  • a sane 3D modelling in blender lessons (preserving texturing and adding advanced materials, possibly even animation!)
  • advanced topics in Newton Game Dynamics featuring character controller and joints

Tutorial chapters (yet to be updated):

  • Introduction
  •     <li>
            <a href="/irrlicht-newton-tutorials/2015/08/26/application-architecture.html">
                Application architecture
            </a>
        </li>
    
        <li>
            <a href="/irrlicht-newton-tutorials/2015/08/27/first-application.html">
                First application
            </a>
        </li>
    
        <li>
            <a href="/irrlicht-newton-tutorials/2015/08/28/first-script.html">
                First script
            </a>
        </li>
    
        <li>
            <a href="/irrlicht-newton-tutorials/2015/08/29/prepare-to-add-some-newtonianity.html">
                Let's add some physics
            </a>
        </li>
    
        <li>
            <a href="/irrlicht-newton-tutorials/2015/12/15/making-simple-level-with-blender.html">
                Modelling simple level with Blender3D
            </a>
        </li>
    
        <li>
            <a href="/irrlicht-newton-tutorials/2015/12/16/finishing-the-first-scene.html">
                Finishing the first scene
            </a>
        </li>
    </ul>
    

One-night games: snake

source code

Under the cut you can find the interesting algorithmic solutions I’ve mentioned.

Read more

Improving ZSH startup performance

Adding profiling to ZSH

Add this line as the first one, to the very top of your ~/.zshrc:

zmodload zsh/zprof

And add this one to the very bottom of this same file:

zprof

Now, whenever you open up ZSH, you shall see a list of things which start and how much time each entry takes to load. For me it was like this:

num  calls                time                       self            name
-----------------------------------------------------------------------------------
 1)    1        1123.49  1123.49   87.59%   1123.49  1123.49   87.59%  _pyenv-from-homebrew-installed
 2)    1          84.02    84.02    6.55%     59.50    59.50    4.64%  compinit
 3)    3          26.94     8.98    2.10%     26.94     8.98    2.10%  __sdkman_export_candidate_home
 4)    3          25.77     8.59    2.01%     25.77     8.59    2.01%  __sdkman_prepend_candidate_to_path
 5)    2          24.52    12.26    1.91%     24.52    12.26    1.91%  compaudit
 6)    2           7.98     3.99    0.62%      7.98     3.99    0.62%  grep-flag-available
 7)    2           7.54     3.77    0.59%      7.54     3.77    0.59%  env_default
 8)    2           2.43     1.22    0.19%      2.43     1.22    0.19%  _has
 9)   23           2.43     0.11    0.19%      2.43     0.11    0.19%  compdef
10)    1           1.09     1.09    0.09%      1.09     1.09    0.09%  colors
11)   12           0.38     0.03    0.03%      0.38     0.03    0.03%  is_plugin
12)    1           0.38     0.38    0.03%      0.38     0.38    0.03%  is-at-least
13)    1           0.21     0.21    0.02%      0.21     0.21    0.02%  _homebrew-installed
14)    1           0.03     0.03    0.00%      0.03     0.03    0.00%  __sdkman_echo_debug

-----------------------------------------------------------------------------------

I was able to measure the total startup time by running time zsh -i -c exit. And the total startup time was almost two seconds.

zsh -i -c exit  1.16s user 0.73s system 100% cpu 1.889 total

As you can see, pyenv takes whole bunch of time (1123 millis!). So I do have the pyenv plugin for ZSH and I did disable it. Here’s what happened afterwards:

num  calls                time                       self            name
-----------------------------------------------------------------------------------
 1)    1          91.42    91.42   53.38%     62.48    62.48   36.48%  compinit
 2)    2          28.94    14.47   16.90%     28.94    14.47   16.90%  compaudit
 3)    3          28.62     9.54   16.71%     28.62     9.54   16.71%  __sdkman_export_candidate_home
 4)    3          27.65     9.22   16.14%     27.65     9.22   16.14%  __sdkman_prepend_candidate_to_path
 5)    2           8.27     4.14    4.83%      8.27     4.14    4.83%  grep-flag-available
 6)    2           8.22     4.11    4.80%      8.22     4.11    4.80%  env_default
 7)    2           2.55     1.28    1.49%      2.55     1.28    1.49%  _has
 8)   23           2.50     0.11    1.46%      2.50     0.11    1.46%  compdef
 9)    1           1.24     1.24    0.72%      1.24     1.24    0.72%  colors
10)    1           0.41     0.41    0.24%      0.41     0.41    0.24%  is-at-least
11)   10           0.37     0.04    0.21%      0.37     0.04    0.21%  is_plugin
12)    1           0.02     0.02    0.01%      0.02     0.02    0.01%  __sdkman_echo_debug

-----------------------------------------------------------------------------------
zsh -i -c exit  0.28s user 0.23s system 96% cpu 0.526 total

NVM

Not to forget I had NVM installed with the default settings.

With it I had the startup time of 1.9 seconds:

zsh -i -c exit  1.17s user 0.74s system 99% cpu 1.916 total

If you follow this simple instruction or just replace these two lines, initializing NVM in your ~/.zshrc file:

[ -s "$NVM_DIR/nvm.sh" ] && \. "$NVM_DIR/nvm.sh"  # This loads nvm
[ -s "$NVM_DIR/bash_completion" ] && \. "$NVM_DIR/bash_completion"  # This loads nvm bash_completion

with these lines:

if [ -s "$HOME/.nvm/nvm.sh" ] && [ ! "$(type __init_nvm)" = function ]; then
 export NVM_DIR="$HOME/.nvm"

 [ -s "$NVM_DIR/bash_completion" ] && . "$NVM_DIR/bash_completion"

 declare -a __node_commands=('nvm' 'node' 'npm' 'yarn' 'gulp' 'grunt' 'webpack')

 function __init_nvm() {
   for i in "${__node_commands[@]}"; do unalias $i; done
   . "$NVM_DIR"/nvm.sh
   unset __node_commands
   unset -f __init_nvm
 }

 for i in "${__node_commands[@]}"; do alias $i='__init_nvm && '$i; done
fi

The start-up time drops by 0.1 second. But it still is an improvement, right?

Software Engineering 101: how computer works

There is some bit of information about computers which I was never told in school or at the university. This writing is trying to cover these bits in details for those interested out there.

Processor’s guts

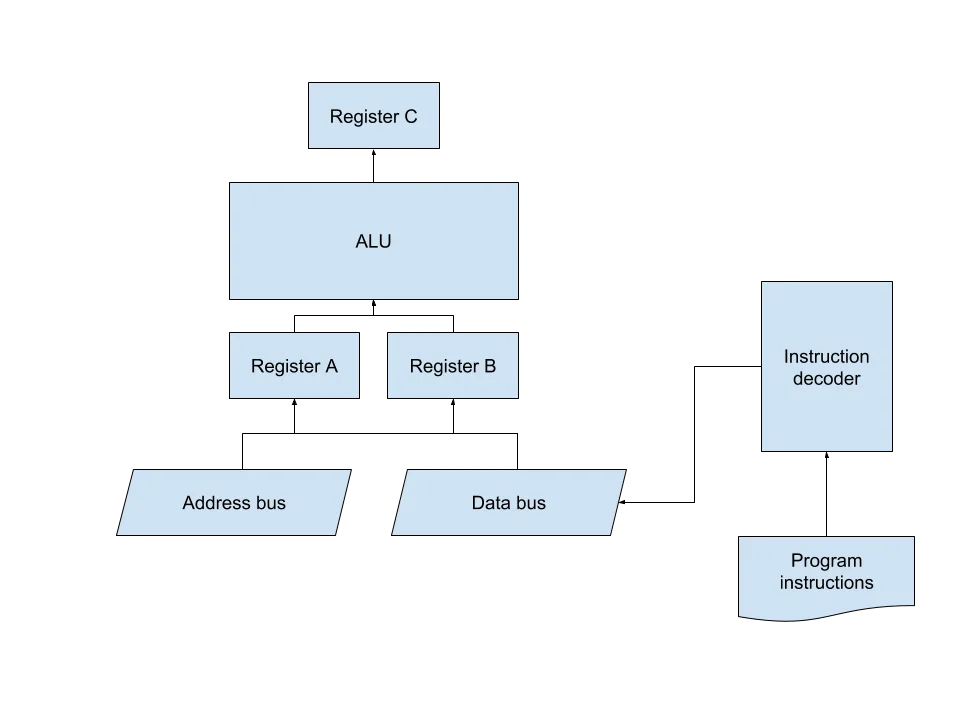
In essence, processor consists of these main blocks:

  • instruction decoder, which decodes the operation code (see below) and tells processor what it should do next
  • ALU (arithmetical-logic unit) - the device, which performs all the operations a processor is capable of - arithmetic (addition, subtraction, multiplication) and logical (bitwise OR, AND, XOR, NOT; comparing numbers)
  • registers are the places, where processor takes the input data for each operation and stores the results of each operations
  • data bus - the place, which passes data to or from memory (RAM, peripheral devices and other types of memory)
  • address bus passes memory addresses between processor and memory (to be read from or written to)

To best illustrate our examples, consider this much simplified processor model:

It has only three registers, ALU and data/address buses. I will explain all the examples below in reference to this processor.

Workflow

Processor works discretely, meaning it executes commands at certain points in time (as opposed to continuous work, where something works all the time). Those points in time are marked by clock signals (or simply, clocks). Processor is connected to (or has an internal one) clock signal generator, which regularly tells processor to operate. Operation is nothing but a change of the internal processor’ state.

So how does processor knows what to do next? On the first clock signal, CPU loads the command with the help of instruction decoder. On the next clock tick, processor starts executing an instruction (or a command) - it either copies data to / from registers or RAM, or involves ALU. On the next clock, processor increases the command counter by one and hence proceeds to the next instruction from the pool.

In reality, this mechanism is somewhat more complex and involves more steps to just even read the command from the pool. And the pool itself is a unit on a processor chip as well and acts as another register. But to explain the processor operation, I’ve simplified that.

Read more to where I explain how a program in Assembly language is transformed to ones and zeroes; show a sample processor instruction set and how a program in C could be compiled to that instruction set.

Read more

IntelliJ productivity tips

This post is based on a talk on IntelliJ productivity and contains some tips and tricks I found handy in my everyday work.

You may disagree with me or find these recommendations useless for yourself, but I and some of my teammates have found out these tips have made us more efficient when dealing with lots of code in a big project.

  • say “no!” to tabs – that’s it – disable them. Forever. IntellJ has many ways to navigate the project, just check them out: Cmd+E, Cmd+Alt+← and Cmd+Alt+→

  • stop using mouse – just as with navigation in open files, IntelliJ offers awesome code navigation: want to go to the method definition? Cmd+B, want to find a file or class or method? Shift, Shift or Ctrl+Shift+N or Ctrl+N, want to move around in Project Manager? Cmd+1 (and then Esc to switch between editor and Manager)

  • use IntelliJ’s code intelligence – if you forgot what params method takes, use Cmp+P, if you want to find variable or class or method usage – use Alt+F7, use the power of “Refactor -> Extract Constant/Field” function

  • use action finder popup – that one can save you lot of time when you do not remember where the function needed is located or what key shortcut to use – Cmd+Shift+A is your friend

WARNING: lots of video/gifs under the cut!

Read more

One-night games: Tetris

Did you ever think of how old games like tetris or snake (hail the Nokia fans!) work?

I always wanted to write a few relatively simple games just to practice my coding skills. Back when I was at the uni, I’ve made peg solitaire and three-in-a-row games in C/C++ with SFML. I even wrote a (pretty shitty) server-client chess game (be warned: this code was written in 2011 and only contains fixes to make it run on a new version of SFML, so it might look… smelly… on each and every line…). My latest achievements were the Entanglement game and a well-designed (at least from my perspective) arcade space shooter.

But I’ve never implemented more well-known games like tetris or snake. And they are interesting from the algorithmic perspective.

And recently I’ve came to the point when I really wanted to create something interesting. And that was the chance to try myself as a early-2000-ies developer!

As I wanted to accomplish my goal as soon as possible, I’ve decided to not pick up any libraries and just implement everything with HTML5 Canvas API. And this is what I ended up with:

In this post I’ll talk about Tetris. Under the cut you’ll find the interesting algorithmic solutions I’ve used for it.

Read more

Floyd-Warshall algorithm

Update

There is a revised version of this blog, showing how an algorithm implementation could be optimized.

The story behind this post

Recently I’ve received +10 karma on StackOverflow. I was curious for what question or answer and clicked to check this. It appeared to be a seven-year-old answer about a Floyd-Warshall algorithm. I was surprised with both my bad English (back those days…) and the very small value the answer had. So I’ve revised it and here it is – the brand-new version!

The definitions

Let us have a graph, described by matrix D, where D[i][j] is the length of the edge (i -> j) (from graph’s vertex with index i to the vertex with index j).

Matrix D has the size of N * N, where N is a total number of vertices in a graph because we can reach the maximum of paths by connecting each graph’s vertex to each other.

Also, we’ll need matrix R, where we will store the vertices of the shortest paths (R[i][j] contains the index of a vertex, where the shortest path from vertex i to vertex j lies).

Matrix R has the same size as D.

The Floyd-Warshall algorithm performs these steps:

  1. initialize the matrix of all the paths between any two pairs of vertices in a graph with the edge’s end vertex (this is important since this value will be used for path reconstruction)

  2. for each pair of connected vertices (read: for each edge (u -> v)), u and v, find the vertex, which forms shortest path between them: if the vertex k defines two valid edges (u -> k) and (k -> v) (if they are present in the graph), which are together shorter than path (u -> v), then assume the shortest path between u and v lies through k; set the shortest pivot point in matrix R for edge (u -> v) to be the corresponding pivot point for edge (u -> k)

But how do we read the matrix D?

Read more

Easy way to understand algorithm complexity and big O notation

Foreword

Some time ago I’ve published an article about bit O notation. I’ve mentioned its source but never published it. So here it is, the original article.

The article

Big O notation is the most widely used method which describes algorithm complexity - the execution time required or the space used in memory or in the disk by an algorithm. Often in exams or interviews, you will be asked some questions about algorithm complexity in the following form:

For an algorithm that uses a data structure of size n, what is the run-time complexity or space complexity of the algorithm? The answer to such questions often uses big O notations to describe the algorithm complexity, such as O(1), O(n), O(n^2) or O(log(n)).

Read more