Install Irrlicht
First of all, you will definetely need the Irrlicht engine, so go get it.
Then you will need to compile it. Compilation process depends on the operating system you use, but it’s really similar on every one.
Linux
Install these dependencies with your system’ package manager:
libenet-dev libxxf86vm-dev zlib-dev cmake.
Unzip Irrlicht, go to the directory you unpacked with the terminal and run the following:
cd source/Irrlicht
make
Belive it or not, but that’s all!
Windows
Unzip Irrlicht, go to the directory you unpacked and open the VisualStudio project (depending on
VisualStudio version, you might want to open a bit different file) in source/Irrlicht:
Irrlicht10.0.sln
Irrlicht11.0.sln
Irrlicht8.0.sln
Irrlicht9.0.sln
Build it with VisualStudio - and you are done!
MacOS X
The steps are a bit complicated. And they require you to install XCode and Command-Line Tools - those could be found either in AppStore or on the Apple website.
-
First of all, you need to install a bunch of dependencies (I use
brewfor this purpose):brew install tinyxml enet lua cmake -
Get a list of all compilers available for your OSX version:
xcodebuild -showBuildSettings | grep DEFAULT_COMPILERI got something like this:
$ xcodebuild -showBuildSettings | grep DEFAULT_COMPILER DEFAULT_COMPILER = com.apple.compilers.llvm.clang.1_0 -
Now the build process:
cd source/Irrlicht/MacOSX xcodebuild -project MacOSX.xcodeproj GCC_VERSION=com.apple.compilers.llvm.clang.1_0 -
And the final step - copy the library to the
lib/MacOSXdirectory:cp build/Release/libIrrlicht.a ../../../lib/MacOSX
Phew! That’s a damn bunch of commands, don’t you think?
Common
By performing those steps, described above, you will end up with the compiled Irrlicht library file
within the lib/ directory, depending on your platform:
Linux/libIrrlicht.a
MacOSX/libIrrlicht.a
Win32-visualstudio/Irrlicht.lib
Win64-visualStudio/Irrlicht.lib
Now, create a blank project in your favorite IDE and proceed…
Application itself
Our first application will show you Irrlicht basic features we will use later. They are:
- mesh handling - loading, rendering, animating, etc.
- user input handling - reacting to keyboard and mouse events
- *user interface (UI) - displaying some information within the application window
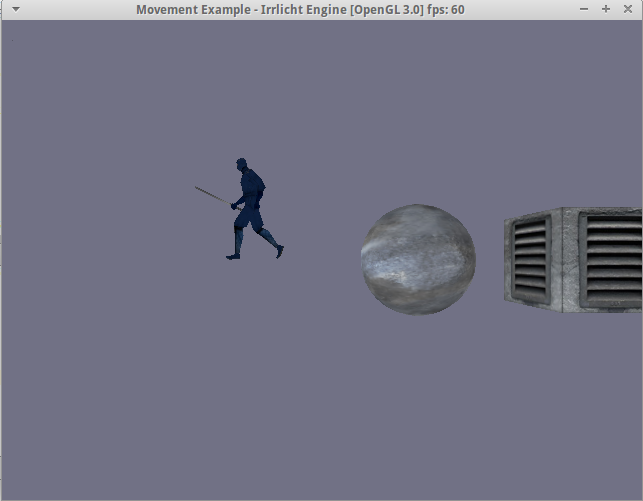
The good start for that is standard example from Irrlicht pack, the 04 - Movement one. Let’s take a look over its code:
/** Example 004 Movement

This Tutorial shows how to move and animate SceneNodes. The
basic concept of SceneNodeAnimators is shown as well as manual
movement of nodes using the keyboard.  We'll demonstrate framerate
independent movement, which means moving by an amount dependent
on the duration of the last run of the Irrlicht loop.

Example 19.MouseAndJoystick shows how to handle those kinds of input.

As always, I include the header files, use the irr namespace,
and tell the linker to link with the .lib file.
*/
#ifdef _MSC_VER
// We'll also define this to stop MSVC complaining about sprintf().
#define _CRT_SECURE_NO_WARNINGS
#pragma comment(lib, "Irrlicht.lib")
#endif

#include <irrlicht.h>

using namespace irr;

/*
To receive events like mouse and keyboard input, or GUI events like "the OK
button has been clicked", we need an object which is derived from the
irr::IEventReceiver object. There is only one method to override:
irr::IEventReceiver::OnEvent(). This method will be called by the engine once
when an event happens. What we really want to know is whether a key is being
held down, and so we will remember the current state of each key.
*/
class MyEventReceiver : public IEventReceiver
{
public:
    // This is the one method that we have to implement
    virtual bool OnEvent(const SEvent& event)
    {
        // Remember whether each key is down or up
        if (event.EventType == irr::EET_KEY_INPUT_EVENT)
            KeyIsDown[event.KeyInput.Key] = event.KeyInput.PressedDown;

        return false;
    }

    // This is used to check whether a key is being held down
    virtual bool IsKeyDown(EKEY_CODE keyCode) const
    {
        return KeyIsDown[keyCode];
    }

    MyEventReceiver()
    {
        for (u32 i=0; i<KEY_KEY_CODES_COUNT; ++i)
            KeyIsDown[i] = false;
    }

private:
    // We use this array to store the current state of each key
    bool KeyIsDown[KEY_KEY_CODES_COUNT];
};

/*
The event receiver for keeping the pressed keys is ready, the actual responses
will be made inside the render loop, right before drawing the scene. So lets
just create an irr::IrrlichtDevice and the scene node we want to move. We also
create some other additional scene nodes, to show that there are also some
different possibilities to move and animate scene nodes.
*/
int main()
{
    // create device
    MyEventReceiver receiver;

    IrrlichtDevice* device = createDevice(video::EDT_OPENGL,
            core::dimension2d<u32>(640, 480), 16, false, false, false, &receiver);

    if (device == 0)
        return 1; // could not create selected driver.

    video::IVideoDriver* driver = device->getVideoDriver();
    scene::ISceneManager* smgr = device->getSceneManager();

    /*
    Create the node which will be moved with the WSAD keys. We create a
    sphere node, which is a built-in geometry primitive. We place the node
    at (0,0,30) and assign a texture to it to let it look a little bit more
    interesting. Because we have no dynamic lights in this scene we disable
    lighting for each model (otherwise the models would be black).
    */
    scene::ISceneNode * node = smgr->addSphereSceneNode();
    if (node)
    {
        node->setPosition(core::vector3df(0,0,30));
        node->setMaterialTexture(0, driver->getTexture("../../media/wall.bmp"));
        node->setMaterialFlag(video::EMF_LIGHTING, false);
    }

    /*
    Now we create another node, movable using a scene node animator. Scene
    node animators modify scene nodes and can be attached to any scene node
    like mesh scene nodes, billboards, lights and even camera scene nodes.
    Scene node animators are not only able to modify the position of a
    scene node, they can also animate the textures of an object for
    example. We create a cube scene node and attach a 'fly circle' scene
    node animator to it, letting this node fly around our sphere scene node.
    */
    scene::ISceneNode* n = smgr->addCubeSceneNode();

    if (n)
    {
        n->setMaterialTexture(0, driver->getTexture("../../media/t351sml.jpg"));
        n->setMaterialFlag(video::EMF_LIGHTING, false);
        scene::ISceneNodeAnimator* anim =
            smgr->createFlyCircleAnimator(core::vector3df(0,0,30), 20.0f);
        if (anim)
        {
            n->addAnimator(anim);
            anim->drop();
        }
    }

    /*
    The last scene node we add to show possibilities of scene node animators is
    a b3d model, which uses a 'fly straight' animator to run between to points.
    */
    scene::IAnimatedMeshSceneNode* anms =
        smgr->addAnimatedMeshSceneNode(smgr->getMesh("../../media/ninja.b3d"));

    if (anms)
    {
        scene::ISceneNodeAnimator* anim =
            smgr->createFlyStraightAnimator(core::vector3df(100,0,60),
            core::vector3df(-100,0,60), 3500, true);
        if (anim)
        {
            anms->addAnimator(anim);
            anim->drop();
        }

        /*
        To make the model look right we disable lighting, set the
        frames between which the animation should loop, rotate the
        model around 180 degrees, and adjust the animation speed and
        the texture. To set the right animation (frames and speed), we
        would also be able to just call
        "anms->setMD2Animation(scene::EMAT_RUN)" for the 'run'
        animation instead of "setFrameLoop" and "setAnimationSpeed",
        but this only works with MD2 animations, and so you know how to
        start other animations. But a good advice is to not use
        hardcoded frame-numbers...
        */
        anms->setMaterialFlag(video::EMF_LIGHTING, false);

        anms->setFrameLoop(0, 13);
        anms->setAnimationSpeed(15);
//      anms->setMD2Animation(scene::EMAT_RUN);

        anms->setScale(core::vector3df(2.f,2.f,2.f));
        anms->setRotation(core::vector3df(0,-90,0));
//      anms->setMaterialTexture(0, driver->getTexture("../../media/sydney.bmp"));

    }

    /*
    To be able to look at and move around in this scene, we create a first
    person shooter style camera and make the mouse cursor invisible.
    */
    smgr->addCameraSceneNodeFPS();
    device->getCursorControl()->setVisible(false);

    /*
    Add a colorful irrlicht logo
    */
    device->getGUIEnvironment()->addImage(
        driver->getTexture("../../media/irrlichtlogoalpha2.tga"),
        core::position2d<s32>(10,20));

    gui::IGUIStaticText* diagnostics = device->getGUIEnvironment()->addStaticText(
        L"", core::rect<s32>(10, 10, 400, 20));
    diagnostics->setOverrideColor(video::SColor(255, 255, 255, 0));

    /*
    We have done everything, so lets draw it. We also write the current
    frames per second and the name of the driver to the caption of the
    window.
    */
    int lastFPS = -1;

    // In order to do framerate independent movement, we have to know
    // how long it was since the last frame
    u32 then = device->getTimer()->getTime();

    // This is the movemen speed in units per second.
    const f32 MOVEMENT_SPEED = 5.f;

    while(device->run())
    {
        // Work out a frame delta time.
        const u32 now = device->getTimer()->getTime();
        const f32 frameDeltaTime = (f32)(now - then) / 1000.f; // Time in seconds
        then = now;

        /* Check if keys W, S, A or D are being held down, and move the
        sphere node around respectively. */
        core::vector3df nodePosition = node->getPosition();

        if(receiver.IsKeyDown(irr::KEY_KEY_W))
            nodePosition.Y += MOVEMENT_SPEED * frameDeltaTime;
        else if(receiver.IsKeyDown(irr::KEY_KEY_S))
            nodePosition.Y -= MOVEMENT_SPEED * frameDeltaTime;

        if(receiver.IsKeyDown(irr::KEY_KEY_A))
            nodePosition.X -= MOVEMENT_SPEED * frameDeltaTime;
        else if(receiver.IsKeyDown(irr::KEY_KEY_D))
            nodePosition.X += MOVEMENT_SPEED * frameDeltaTime;

        node->setPosition(nodePosition);

        driver->beginScene(true, true, video::SColor(255,113,113,133));

        smgr->drawAll(); // draw the 3d scene
        device->getGUIEnvironment()->drawAll(); // draw the gui environment (the logo)

        driver->endScene();

        int fps = driver->getFPS();

        if (lastFPS != fps)
        {
            core::stringw tmp(L"Movement Example - Irrlicht Engine [");
            tmp += driver->getName();
            tmp += L"] fps: ";
            tmp += fps;

            device->setWindowCaption(tmp.c_str());
            lastFPS = fps;
        }
    }

    /*
    In the end, delete the Irrlicht device.
    */
    device->drop();

    return 0;
}

/*
That's it. Compile and play around with the program.
**/
Building the project
Paste the code from above to your blank project in your IDE, in the source/main.cpp file.
This may differ, but is not critical. Now, add the CMakeLists.txt file to your project
and fill it with these commands:
cmake_minimum_required(VERSION 3.1)
project(irrlicht_newton_game1)

set(CMAKE_CXX_FLAGS "${CMAKE_CXX_FLAGS} -std=c++11")

find_package(X11)
find_package(OpenGL)
find_package(ZLIB)

if (NOT IRRLICHT_LIBRARY_PATH)
    find_library(IRRLICHT_LIBRARY_PATH
            NAMES Irrlicht
            PATHS ${IRRLICHT_PATH}/lib/
            PATH_SUFFIXES Linux MacOSX Win32-gcc Win32-visualstudio Win64-visualstudio)

    message(STATUS "Found Irrlicht: ${IRRLICHT_LIBRARY_PATH}")
endif()

include_directories(${IRRLICHT_PATH}/include)

set(SOURCE_FILES source/main.cpp)
set(EXECUTABLE_NAME irrlicht_newton_game1)

add_executable(${EXECUTABLE_NAME} ${SOURCE_FILES})

target_link_libraries(${EXECUTABLE_NAME}
        ${IRRLICHT_LIBRARY_PATH}
        ${X11_LIBRARIES}
        ${OPENGL_LIBRARIES}
        ${ZLIB_LIBRARIES}
        ${X11_Xxf86vm_LIB})
Note: for those of you, guys, running MacOS X I prepared a bit more complicated
CMakeLists.txt file - just to make our application run everywhere:
cmake_minimum_required(VERSION 3.1)
project(irrlicht_newton_game1)

set(CMAKE_CXX_FLAGS "${CMAKE_CXX_FLAGS} -std=c++11")

option("NEWTON_DEMOS_SANDBOX" "Build demos sandbox" OFF)

set(LUACPPINTERFACE_PATH source/luacppinterface-master)
set(CPPFORMAT_PATH source/cppformat-master)
set(NEWTONGD_PATH source/newton-dynamics-master)
set(NEWTONGD_INCLUDE_DIRS
        ${NEWTONGD_PATH}/packages/dCustomJoints
        ${NEWTONGD_PATH}/packages/dContainers
        ${NEWTONGD_PATH}/packages/dMath
        )

set(NEWTON_LIBRARIES Newton dMath)

add_subdirectory(${LUACPPINTERFACE_PATH})
add_subdirectory(${CPPFORMAT_PATH})
add_subdirectory(${NEWTONGD_PATH})

find_package(X11)
find_package(OpenGL)
find_package(ZLIB)
find_package(Lua)

if (NOT IRRLICHT_LIBRARY_PATH)
    if (UNIX)
        set(IRRLICHT_PATH_SUFFIX Linux)
    endif()

    if (APPLE)
        set(IRRLICHT_PATH_SUFFIX MacOSX)
    endif()

    if (WIN32)
        if (MSVC)
            set(IRRLICHT_PATH_SUFFIX Win32-visualstudio Win64-visualstudio)
        endif()

        if (MINGW)
            set(IRRLICHT_PATH_SUFFIX Win32-gcc)
        endif()
    endif()

    find_library(IRRLICHT_LIBRARY_PATH
            NAMES Irrlicht
            PATHS ${IRRLICHT_PATH}/lib/
            PATH_SUFFIXES ${IRRLICHT_PATH_SUFFIX})

    message(STATUS "Found Irrlicht: ${IRRLICHT_LIBRARY_PATH}")
endif()

set(LIBRARIES luacppinterface
        cppformat
        ${NEWTON_LIBRARIES}
        ${IRRLICHT_LIBRARY_PATH}
        ${X11_LIBRARIES}
        ${OPENGL_LIBRARIES}
        ${ZLIB_LIBRARIES}
        ${LUA_LIBRARIES})

if (NOT APPLE)
    set(LIBRARIES ${LIBRARIES} ${X11_Xxf86vm_LIB})
endif()

include_directories(${IRRLICHT_PATH}/include
        ${LUA_INCLUDE_DIR}
        ${LUACPPINTERFACE_PATH}/include
        ${CPPFORMAT_PATH}
        ${NEWTONGD_INCLUDE_DIRS})

set(SOURCE_FILES source/main.cpp)
set(EXECUTABLE_NAME irrlicht_newton_game1)

add_executable(${EXECUTABLE_NAME} ${SOURCE_FILES})

if (APPLE)
    set(CMAKE_CXX_FLAGS "${CMAKE_CXX_FLAGS} -framework Foundation -framework OpenGL -framework Cocoa -framework Carbon -framework AppKit -framework IOKit")
endif()

target_link_libraries(${EXECUTABLE_NAME}
        ${LIBRARIES})
CMake file
But what happens in all that code? First two lines of our CMakeLists.txt file define the project:
cmake_minimum_required(VERSION 3.1)
project(irrlicht_newton_game1)
Then we modify the variable CMAKE_CXX_FLAGS, which will be used to set compiler flags.
This is how we add items to lists or modify string variables with CMake: we set it the new
value, consisting of the old one and the new elements / parts:
set(CMAKE_CXX_FLAGS "${CMAKE_CXX_FLAGS} -std=c++11")
Then we tell CMake not to build Newton demo sandbox subproject and set a few path variables - we will use them to point compiler to the header and library files of our third-party libraries (like Newton itself, Irrlicht and others).
Remember: these are only plain variables, they have no effect on compiler themselves.
set(LUACPPINTERFACE_PATH source/luacppinterface-master)
set(CPPFORMAT_PATH source/cppformat-master)
set(NEWTONGD_PATH source/newton-dynamics-master)
set(NEWTONGD_INCLUDE_DIRS
        ${NEWTONGD_PATH}/packages/dCustomJoints
        ${NEWTONGD_PATH}/packages/dContainers
        ${NEWTONGD_PATH}/packages/dMath
        )

set(NEWTON_LIBRARIES Newton dMath)
Next, we point CMake to our sub-projects, which are by the fact our third-party libraries:
add_subdirectory(${LUACPPINTERFACE_PATH})
add_subdirectory(${CPPFORMAT_PATH})
add_subdirectory(${NEWTONGD_PATH})
These tell CMake to build sub-projects before building our application. Because our sub-projects are nothing but libraries, we can then look for the built libraries, required by our project in the sub-projects’ output directories like this:
find_package(Lua)
Same way we look for system libraries:
find_package(X11)
find_package(OpenGL)
find_package(ZLIB)
These commands set compile-ready variables like X11_LIBRARIES.
Some sub-projects may set CMake variables too, providing us with paths to include files or library files. If Irrlicht did not do this, we try to find its paths with CMake:
if (NOT IRRLICHT_LIBRARY_PATH)
    if (UNIX)
        set(IRRLICHT_PATH_SUFFIX Linux)
    endif()

    if (APPLE)
        set(IRRLICHT_PATH_SUFFIX MacOSX)
    endif()

    if (WIN32)
        if (MSVC)
            set(IRRLICHT_PATH_SUFFIX Win32-visualstudio Win64-visualstudio)
        endif()

        if (MINGW)
            set(IRRLICHT_PATH_SUFFIX Win32-gcc)
        endif()
    endif()

    find_library(IRRLICHT_LIBRARY_PATH
            NAMES Irrlicht
            PATHS ${IRRLICHT_PATH}/lib/
            PATH_SUFFIXES ${IRRLICHT_PATH_SUFFIX})

    message(STATUS "Found Irrlicht: ${IRRLICHT_LIBRARY_PATH}")
endif()
Note the environment variables CMake provides us with: UNIX, APPLE, WIN32, MSVC
and many others. They describe which operating system CMake was ran under and which
compiler it was told to use.
And the most important part of our CMakeLists.txt file:
include_directories(${IRRLICHT_PATH}/include
        ${LUA_INCLUDE_DIR}
        ${LUACPPINTERFACE_PATH}/include
        ${CPPFORMAT_PATH}
        ${NEWTONGD_INCLUDE_DIRS})

set(SOURCE_FILES source/main.cpp)
set(EXECUTABLE_NAME irrlicht_newton_game1)

add_executable(${EXECUTABLE_NAME} ${SOURCE_FILES})
This actually runs the compiler with the include directories, source files and output file specified.
After that, we may run linker to link the intermediate object files, provided by compiler, and end up with the application executable:
target_link_libraries(${EXECUTABLE_NAME}
        ${LIBRARIES})
For OSX users there is a small hack, needed to build the application:
if (APPLE)
    set(CMAKE_CXX_FLAGS "${CMAKE_CXX_FLAGS} -framework Foundation -framework OpenGL -framework Cocoa -framework Carbon -framework AppKit -framework IOKit")
endif()
Note the order the commands are specified in: having include path variables definitions
placed before sub-projects commands may be no harmful, but more “effective” commands,
like compiling sub-projects (add_subdirectory) depend on other CMake commands, so
be sure to keep the order sane and clean.
Running the build
Now that you are ready, run the following commands from your project directory
(you will need cmake to be installed in your system):
mkdir build
cd build
cmake -DIRRLICHT_PATH=path_to_directory_where_you_unpacked_irrlicht ..
make
Warning: do not forget to replace path_to_directory_where_you_unpacked_irrlicht with
the actual path to the directory, where your Irrlicht files lay!
This will build our first Irrlicht application. Not obvious how handy it is right now, but you will see the power of CMake in our later sessions.
Before you run the application, copy the whole media directory from the Irrlicht
dir to the parent dir of your project. You should end up with directory structure like this:
.
└── irrlicht_newton_tutorials
    ├── irrlicht_newton_game1
    │   ├── build
    │   ├── CMakeLists.txt
    │   └── source
    │       └── main.cpp
    └── media
Note: If you now just run the irrlicht_newton_game1 binary on OSX, you will see
your application does not react to keyboard events. This is tricky, but you need
to pack your application as OSX application. This is easy, though: just create
a directory tree mkdir -p irrlicht_newton_game1.app/Contents/MacOS/ and move
your binary file there:
├── irrlicht_newton_game1.app
│   └── Contents
│       └── MacOS
│           └── irrlicht_newton_game1
Open Finder and run the application from there. On other operating systems run
the executable file in your build directory.
Buuuuut, since we have CMake, we may simplify this task because this is a part of application build process. So we need to create a usual binary file, when we are running Linux or Windows or create a directory structure with binary on its deepest level, when running OSX. CMake allows to do it in a really easy way:
if (APPLE)
    add_executable(${EXECUTABLE_NAME} MACOSX_BUNDLE ${SOURCE_FILES})
else()
    add_executable(${EXECUTABLE_NAME} ${SOURCE_FILES})
endif()
You should see something like this:
To end the process you may consider switching to a terminal and running
pkill irrlicht_newton_game1
Understanding the code
Here are few simple things we could extract from application’ code and understand right from scratch:
- Each 3D model is a scene node
-
Primitive scene nodes (such as cube or sphere) could be easily created with built-in functions:
scene::ISceneNode* node = smgr->addSphereSceneNode(); scene::ISceneNode* node = smgr->addCubeSceneNode(); -
Animated 3D models (such as character models) could be loaded from file:
scene::IAnimatedMeshSceneNode* node = smgr->addAnimatedMeshSceneNode(smgr->getMesh("../../media/ninja.b3d"));Hint: if mesh is animated, animation could be started with:
  node->setFrameLoop(0, 13);
  node->setAnimationSpeed(15);
Hint: animation could be stopped with setting its speed to zero:
node->setAnimationSpeed(0); -
Node could be described not only by its vertices and indices (forming a set of triangles which are drawn in 3D forming a model, called mesh) but by its position, rotation and scale
Those could be set with:
node->setPosition(core::vector3df(x, y, z));
node->setRotation(core::vector3df(x_angle, y_angle, z_angle));
node->setScale(core::vector3df(width_factor, height_factor, depth_factor));
Hint: rotation is a set of angles relatively to the corresponding axes, the node will be rotated around. E. g.,
vector3df(45, 90, 0)sets the rotation by45 degaroundX axis,90 degaroundY axisand no rotation aroungZ axis. All those axes are relative to the node itself.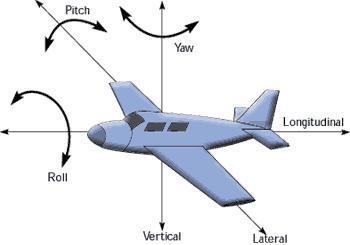
-
Graphics User Interface’ (GUI) widgets for information output are labels; they are created with GUI Manager:
gui::IGUIStaticText* label = device->getGUIEnvironment()->addStaticText(L"", core::rect<s32>(10, 10, 400, 20));Hint: its text could be set with:
label->setText((const wchar_t*) "some text"); -
User input is handled by an external
IEventReceiverclass object.Its method,
virtual bool OnEvent(const SEvent& event)defines the logic of handling events like mouse events, keyboard events, joystick events, GUI events, etc.
The type of event is passed with the
event.EventTypefield. The corresponding field is filled with the event parameters.For example:
if (event.type == EET_MOUSE_INPUT_EVENT) {
    if (event.MouseInput.isLeftPressed()) {
        printf("%d, %d is cursor position\n", event.MouseInput.X, event.mouseInput.Y);
    }
}
Hint:
EventReceiverobject has nothing in common with our main game loop. So we should create some interface, some architecture trick to link those two. Because they are strongly related! -
Main game loop should contain rendering call, GUI rendering call and other game logic processing calls.
The simplest main loop could look like this:
while (device->run()) { driver->beginScene(true, true, video::SColor(255, 113, 113, 133)); smgr->drawAll(); // draw the 3d scene device->getGUIEnvironment()->drawAll(); // draw the gui driver->endScene(); } -
There is no simple (or at least, built-in) way to get the delta time between two rendered frames. This is an important variable! We’ll need that later, when we inject physics engine. And Newton GD is not the only engine requiring this variable!
But that could be easily done with this workaround:
  // before main loop
  u32 then = device->getTimer()->getTime();

  // ...

  // within the main game loop
  const u32 now = device->getTimer()->getTime();
  const f32 frameDeltaTime = (f32)(now - then) / 1000.f; // delta time in seconds
  then = now;
That was some short introduction to the Irrlicht engine. And that’s basically everything we will use for the next few sections.