Entanglement

Entanglement?
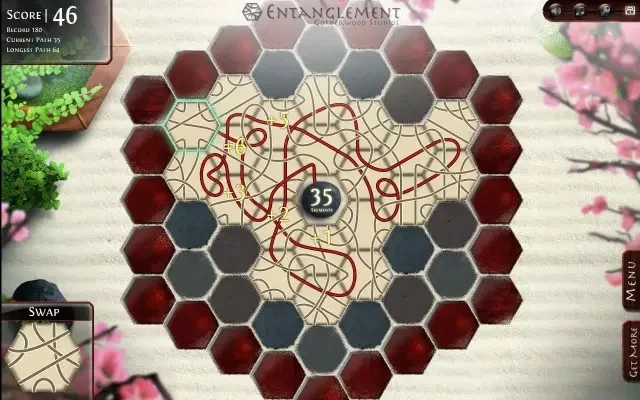
Some time ago there was a game popular over there, called Entanglement:
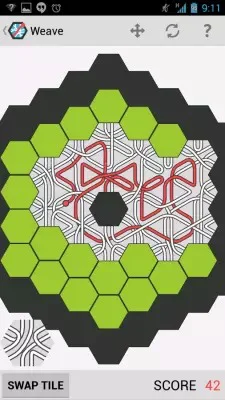
There are a few implementations of this game under Android:

But there was no such game for iOS. And as I pursued my second M. Sc. degree, I have had a course “iOS development”, where we were learning to use Swift and iOS platform.
I decided to implement this game as my course project. In Swift. Originally the game was implemented in Swift 2 (there was no Swift 3 back those days).
And recently I decided to refactor the game a bit and update it to the most recent Swift version (which is Swift 3 at the moment of writing this post).
In this post I’ll describe some interesting decisions I made while creating this game.
The game
The idea of the game is to prolong the line as much as possible by using the tiles with pieces of a path for a line. At the beginning of the game, a single tile is placed at the center of a hexagonal field and the line starts from that tile. You are also given a tile in the “pocket”, which you can swap with the currently active one. At each turn, a game will place a new tile at the end of the line and you have three actions available:
- rotate the current tile clockwise or counter-clockwise, as many times as you want
- swap the current tile with one in the pocket; you can repeat this action as many times as you want to
- place the tile; this action is performed once and can not be undone
But the trick here is: each tile contains six line pieces. And by using one of them, be aware that other pieces might be used later as well.
When you place a tile, you get one point for the first piece of the line, which prolongs it. You also get one point more for the next piece, if it prolongs the line too. For the third line piece, you’ll get 3 points and so on. The point here is: the more pieces you connect in a single move - the more points you get.
Implementation
My implementation contains several core elements:
- tiles
- field
- tile renderer
- game itself
Tiles contain information on the line pieces they contain and provide methods to rotate themselves and find connections with neighbor tiles.
The field contains information on all the tiles on the field - where they are placed and how they are rotated.
Tile renderer simply draws tiles into an image. Doing so allows having an animation for tile rotation.
The game holds all the data on the game state - tile in the pocket, currently selected tile, line path done so far and a score.
Field
The core of the game is tiles. The tiles are hexagons. And the whole field is hexagonal. The problem was to handle the positions of all the tiles in a handy manner. Thus I decided to go from a standard Cartesian coordinate system, which has 90° angle between axes and go for a one with 120°:
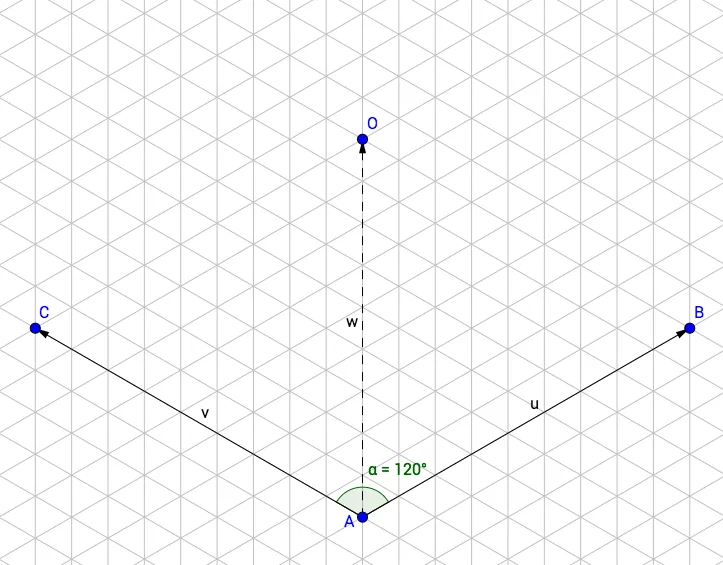
Here, u and v vectors represent coordinate axes and w vector is a diagonal. So the tiles
could now be allocated so their centers are at the points of the coordinate system with integer
coordinates:
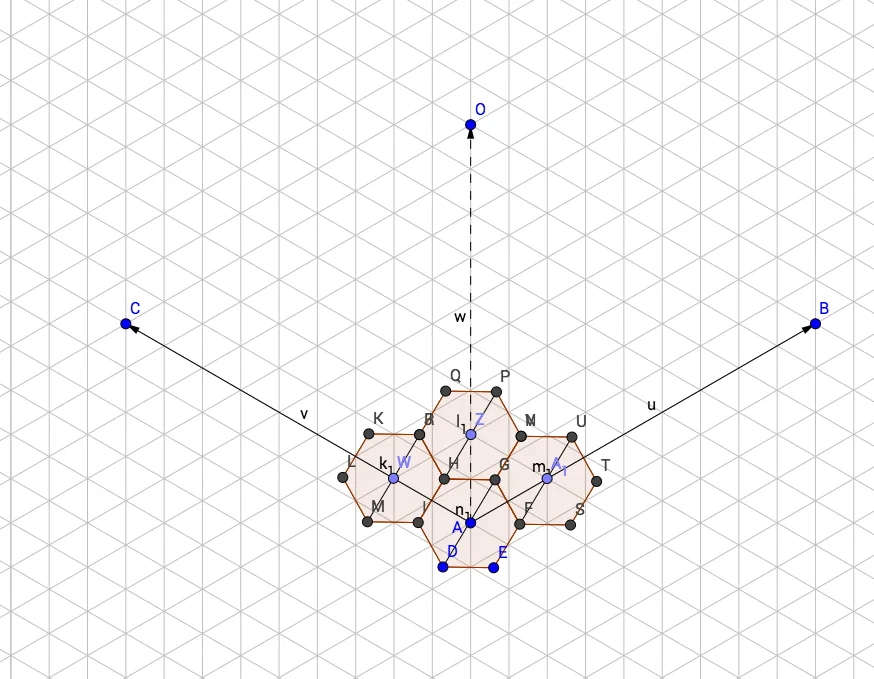
Now, there’s a tricky thing regarding this coordinate system: how should we know, where to render the actual tile image on a screen? E. g. how can we convert coordinates in this system back to Cartesian?
After doing some math on a piece of paper, I came up with this function:
func uv2xy(_ uv: (Int, Int)) -> (Int, Int) {
    let u = uv.0, v = uv.1
    let kx = Float(u - v) * (3.0 / 2.0)
    let ky = Float(u + v) * (sqrt(3.0) / 2.0)
    let x = Int(ceil(kx * Float(tileSideLength)))
    let y = Int(ceil(ky * Float(tileSideLength)))

    let cx = 9 * (tileSideLength)
    let cy = Int(ceil(8.0 * sqrt(3.0) * Float(tileSideLength)))

    return (cx + x, cy - y)
}
What happens here is: since every tile is a regular hexagon, we can simply calculate the distance between the sides
of neighbour tiles and, based on how the tiles are layed out relative to each other, multiply that by either taking
one and a half of every coordinate system unit or sqrt(3) / 2 of one unit. The sqrt(3) / 2 comes from the length
of a unit regular hexagon’s height (a line, perpendicular to any side of a hexagon, starting at its center). Every
unit scales with the tile’ size.
As you can see, it depends on tile side length. This is the major tile parameter. Since I render tiles based on that parameter.
Tiles
Each tile should have six lines. To do that, I created 12 “connection slots”, two on each side of a tile, as shown below:
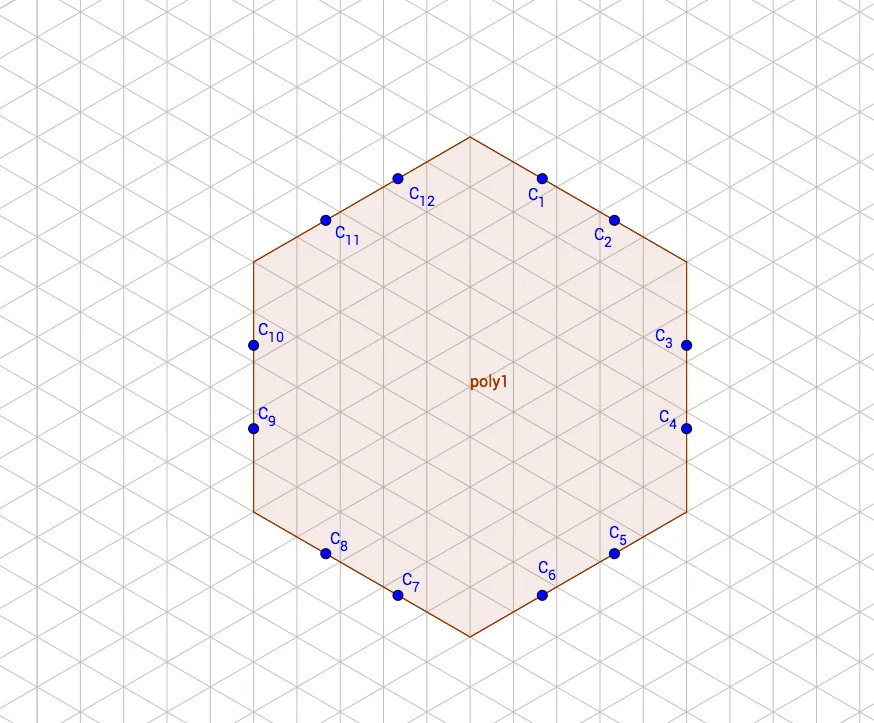
Then, by generating six random pairs of integer numbers from the range [1, 12], we can obtain actual
connections inside a single tile. Note that none of the numbers should be used more than once and
that none of the pairs should have a duplicate. Then a tile might look like this:
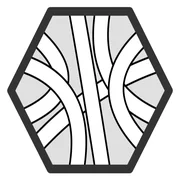
To display a tile, I’ve developed a prototype tile in SVG:
<svg height="232" width="232">
  <polygon points="55.0,5.0 155.0,5.0 205.0,92.0 155.0,178.0 55.0,178.0 5.0,92.0" style="fill:none;stroke:#000;stroke-width:2" />
</svg>
And to make this template re-usable, I’ve dropped in a “side length” parameter. Pre-calculating pins’ slots positions and hexagon’s vertex positions and making it parametric (with a side length parameter), I’ve got this function, which generates a tile:
class TileImageGenerator {
    let vertices: [(Int, Int)] = [(50, 0), (150, 0), (200, 87), (150, 173), (50, 173), (0, 87)]

    var width: Int
    var height: Int
    var scaleCoefficient: Float
    var centerX: Int
    var centerY: Int

    init(sideLength: Int) {
        self.scaleCoefficient = Float(self.sideLength) / 100.0

        self.width = Int(ceil(2.0 * Float(self.sideLength)))
        self.height = Int(ceil(1.73 * Float(self.sideLength)))

        self.centerX = (self.width / 2)
        self.centerY = (self.height / 2)
    }

    func borderTile() -> UIImage {
        let size = CGSize(width: self.width, height: self.height)
        let opaque = false
        let scale: CGFloat = 0

        UIGraphicsBeginImageContextWithOptions(size, opaque, scale)
        let context = UIGraphicsGetCurrentContext()

        // draw outer shape
        let shapePathRef: CGMutablePath = CGMutablePath()

        context?.setFillColor(UIColor.black.cgColor)
        context?.setLineJoin(CGLineJoin.round)

        for i in 1...(self.vertices.count - 1) {
            let x1 = CGFloat(Float(self.vertices[i].0) * self.scaleCoefficient)
            let y1 = CGFloat(Float(self.vertices[i].1) * self.scaleCoefficient)

            if i == 1 {
                let x0 = CGFloat(Float(self.vertices[i - 1].0) * self.scaleCoefficient)
                let y0 = CGFloat(Float(self.vertices[i - 1].1) * self.scaleCoefficient)

                shapePathRef.move(to: CGPoint(x: x0, y: y0))
            }

            shapePathRef.addLine(to: CGPoint(x: x1, y: y1))
        }

        shapePathRef.closeSubpath()

        context?.addPath(shapePathRef)
        context?.fillPath()

        // finish drawing
        let image = UIGraphicsGetImageFromCurrentImageContext()
        UIGraphicsEndImageContext()

        return image!
    }
}
Now, if I want to draw connection lines, I can just spicy that code with pre-calculated pin slots connections coordinates and, using some neat line stroke technique, draw tile exactly as shown above:
class RenderingParams {
    var sideLength: Int
    var stroke: Int = 1
    var pathStroke: Int = 4
    var strokeColor: UIColor
    var pathColor: UIColor
    var highlightPathColor: UIColor
    var markPathColor: UIColor

    init(sideLength: Int,
        stroke: Int = 1,
        pathStroke: Int = 4,
        strokeColor: UIColor = UIColor(red: 0.2, green: 0.2, blue: 0.2, alpha: 1.0),
        pathColor: UIColor = UIColor.white,
        highlightPathColor: UIColor = UIColor(red: 0.9, green: 0.5, blue: 0.5, alpha: 1.0),
        markPathColor: UIColor = UIColor(red: 0.9, green: 0.15, blue: 0.15, alpha: 1.0)) {
            self.sideLength = sideLength
            self.stroke = stroke
            self.pathStroke = pathStroke
            self.strokeColor = strokeColor
            self.pathColor = pathColor
            self.highlightPathColor = highlightPathColor
            self.markPathColor = markPathColor
    }
}

class TileImageGenerator {
    let vertices: [(Int, Int)] = [(50, 0), (150, 0), (200, 87), (150, 173), (50, 173), (0, 87)]
    let pins: [(Int, Int)] = [(83, 0), (116, 0), (166, 29), (182, 58), (182, 116), (166, 145), (116, 173), (83, 173), (34, 145), (18, 116), (18, 58), (34, 29)]

    var width: Int
    var height: Int
    var scaleCoefficient: Float
    var centerX: Int
    var centerY: Int

    var renderingParams: RenderingParams

    init(renderingParams: RenderingParams) {
        self.renderingParams = renderingParams

        self.scaleCoefficient = Float(self.sideLength) / 100.0

        self.width = Int(ceil(2.0 * Float(self.sideLength + (self.renderingParams.stroke * 2))))
        self.height = Int(ceil(1.73 * Float(self.sideLength + (self.renderingParams.stroke * 2))))

        self.centerX = (self.width / 2)
        self.centerY = (self.height / 2)
    }

    func nonEmptyTile(_ tileParams: TileParams) -> UIImage {
        let size = CGSize(width: self.width, height: self.height)
        let opaque = false
        let scale: CGFloat = 0

        UIGraphicsBeginImageContextWithOptions(size, opaque, scale)
        let context = UIGraphicsGetCurrentContext()

        // draw outer shape
        let shapePathRef: CGMutablePath = CGMutablePath()

        context?.setFillColor(UIColor(red: 0.88, green: 0.88, blue: 0.88, alpha: 1.0).cgColor)
        context?.setLineJoin(CGLineJoin.round)

        for i in 1...(self.vertices.count - 1) {
            let x1 = CGFloat(Float(self.vertices[i].0) * self.scaleCoefficient + Float(self.renderingParams.stroke * 2))
            let y1 = CGFloat(Float(self.vertices[i].1) * self.scaleCoefficient + Float(self.renderingParams.stroke * 2))

            if i == 1 {
                let x0 = CGFloat(Float(self.vertices[i - 1].0) * self.scaleCoefficient + Float(self.renderingParams.stroke * 2))
                let y0 = CGFloat(Float(self.vertices[i - 1].1) * self.scaleCoefficient + Float(self.renderingParams.stroke * 2))

                shapePathRef.move(to: CGPoint(x: x0, y: y0))
            }

            shapePathRef.addLine(to: CGPoint(x: x1, y: y1))
        }

        shapePathRef.closeSubpath()

        context?.addPath(shapePathRef)
        context?.fillPath()

        // draw connections
        for (c0, c1) in tileParams.connections {
            context?.setLineWidth(CGFloat(self.renderingParams.pathStroke))

            let connectionPathRef: CGMutablePath = CGMutablePath()
            var pathColor: CGColor

            if tileParams.mark.contains(where: { ($0.0 == c0 && $0.1 == c1) || ($0.0 == c1 && $0.1 == c0) }) {
                pathColor = self.markPathColor.cgColor
            } else if tileParams.highlight.contains(where: { ($0.0 == c0 && $0.1 == c1) || ($0.0 == c1 && $0.1 == c0) }) {
                pathColor = self.renderingParams.highlightPathColor.cgColor
            } else {
                pathColor = self.renderingParams.pathColor.cgColor
            }

            let p0x = CGFloat(Float(self.pins[c0].0) * self.scaleCoefficient + Float(self.renderingParams.stroke * 2))
            let p0y = CGFloat(Float(self.pins[c0].1) * self.scaleCoefficient + Float(self.renderingParams.stroke * 2))

            let p1x = CGFloat(Float(self.pins[c1].0) * self.scaleCoefficient + Float(self.renderingParams.stroke * 2))
            let p1y = CGFloat(Float(self.pins[c1].1) * self.scaleCoefficient + Float(self.renderingParams.stroke * 2))

            connectionPathRef.move(to: CGPoint(x: p0x, y: p0y))
            connectionPathRef.addQuadCurve(to: CGPoint(x: p1x, y: p1y), control: CGPoint(x: self.centerX, y: self.centerY))

            context?.setLineWidth(CGFloat(Float(self.renderingParams.pathStroke) * 1.25))
            context?.setStrokeColor(UIColor.black.cgColor)
            context?.addPath(connectionPathRef)
            context?.strokePath()

            context?.setLineWidth(CGFloat(self.renderingParams.pathStroke))
            context?.setStrokeColor(pathColor)
            context?.addPath(connectionPathRef)
            context?.strokePath()
        }

        // stroke out the outer shape to cover the paths
        context?.setStrokeColor(self.renderingParams.strokeColor.cgColor)
        context?.setLineWidth(CGFloat(Float(self.renderingParams.stroke)))
        context?.addPath(shapePathRef)
        context?.strokePath()

        // finish drawing
        let image = UIGraphicsGetImageFromCurrentImageContext()
        UIGraphicsEndImageContext()

        return image!
    }
}
As you can see, two major things happened here:
- I encapsulated all the parameters like line stroke width and line colors ina a separate class,
RenderingParams - I added rendering lines using two-time rendering technique to emulate borders over connection lines; e. g. I first draw a thick line, filled with the stroke color, which should be applied, and then I render a thinner line with exactly the same coordinates, but different color; doing so, the bottom line becomes just a background for the top one
Now, tiles should be rotated. To do that, two tricks have been applied:
- as we have our tiles drawn as
UIImage, we can simply rotate that image around its center to create the visual effect of rotation - as we have our connection pins as a plain array, we can just re-calculate the indices of connection’s “input” and “output”
There are a couple of points, which should be described prior to the algorithm of a tile rotation.
The tiles are connected using those connection pins. And based on the coordinates of a tile and its neighbor, we can tell, which pins of those two will be connected. And since our game goal is to prolong a single line, by keeping track of which connections of which tiles form a line, we may define a couple rules:
- given connected pins inside one tile, we may describe that connection in two pins’ indices, namely “input” and “output”
- connections of a tile, not involved in forming a line, can be treated in either way - input and output could be named in a reversed order (again, unless they are forming a line, otherwise it’s essential to say where the line comes from and where it ends inside a given tile)
- the central tile will have only one output - the one, where the line starts its journey; let it be the connection pair
(0, 0) - one can easily calculate the neighbor’s output, given the last tile of a line path and its successor
Let’s define a class Tile:
class Tile {
    var connections: [(Int, Int)]
}
Simple enough, right? Now let’s assume our program will fill out connections list automatically and
all the tiles will be assigned the correct list of connections. Given that, we may define two helper
methods on a Tile class:
class Tile {
    var connections: [(Int, Int)]

    func output(from input: Int) -> Int {
        for (inPin, outPin) in self.connections {
            if inPin == input {
                return outPin
            }

            if outPin == input {
                return inPin
            }
        }
    }

    func input(from output: Int) -> Int {
        if (output % 2) == 0 {
            return (output + 12 - 5) % 12
        } else {
            return (output + 12 + 5) % 12
        }
    }
}
The first one, output(from input: Int) will return us the output index inside a given tile, where the line
will come out from, when entering our tile from input with index from.
So, for example, given a tile with connections
let t: Tile = Tile()
t.connections = [(0, 1), (11, 8), (10, 5), (3, 4), (6, 2), (7, 9)]
the call t.output(from: 11) will give us 8, which could be easily found from the list of connections
by hand.
The second method will give us the input index inside the neighbor tile, which is connected to an output of the given tile.
And for the example above, the call t.input(from: 0) will give us 7. And here’s an image to show why:
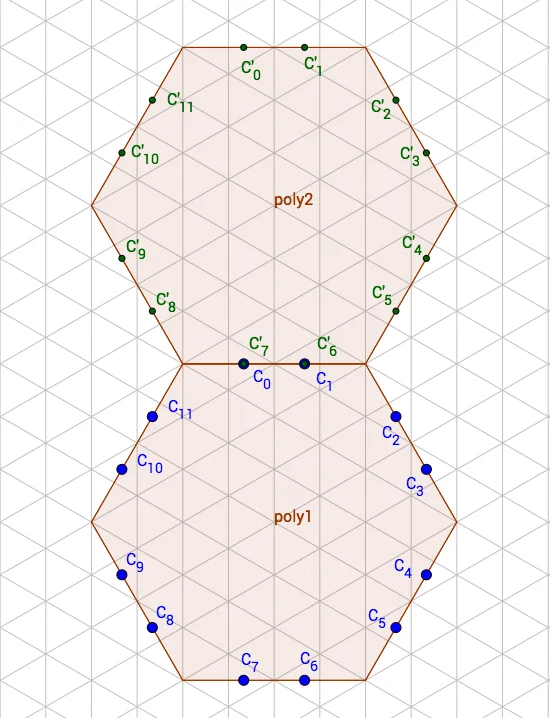
Given we have a portion of a path layed out on a game plane already, there is only one way of correctly placing each next tile (the path which is already present on a plane never changes and always comes to the same connection point).
And now it’s finally the time to explain the rotation of the tiles!
After a tile has been assigned a set of connected pins, the rotation should preserve those connections. The rotation operation uses modulo operation, as with calculating neighbor tile’s input pin index, but on a scale of each connection pair (a pair of input and output):
class Tile {
    // ...

    func rotate(_ direction: Int) {
        self.connections = self.connections.map { (input: Int, output: Int) in
            ((input + (direction * 2) + 12) % 12, (output + (direction * 2) + 12) % 12)
        }
    }

    //...
}
Here, direction is either 1 for clockwise rotation or -1 for counter-clockwise rotation.
Path prediction
Finding a place where to put the next tile is an iterative process, which hardly depends on a current tile (its connections and position) and the tiles which are already placed on the field.
At the very beginning of the game, the next place could be set as a constant and is always above the
central tile (so if the central tile has the position (4, 4), then the next place would be (5, 5) - along with the diagonal in our coordinate system).
To track the boundaries of a field and the beginning of the line (in other words - the places, where the line cannot go), I inherited a Tile class with a set of other classes just to track if the game can
continue or not: ZeroTile and BorderTile represent restricted bounds of a game field.
Now, given the output of a current tile, which the line will use to continue through the tile, we can predict where the next tile should be put on a field:
func findNextPlace(_ path: Path, currentPosition: (Int, Int)) -> (Int, Int) {
    var u: Int, v: Int
    (u, v) = currentPosition

    let output: Int = path.lastOutput()

    switch output {
    case 0, 1:
        return (u + 1, v + 1)
    case 2, 3:
        return (u + 1, v)
    case 4, 5:
        return (u, v - 1)
    case 6, 7:
        return (u - 1, v - 1)
    case 8, 9:
        return (u - 1, v)
    case 10, 11:
        return (u, v + 1)
    default:
        return (u, v)
    }
}
If, however, there is a tile at the next place on the field, we should use its connections to determine the next position.
Otherwise, if the next position is either the border of a field or an empty space - we stop the search.
Search itself is just as simple as that:
func findFuturePath(_ tile: NonEmptyTile) throws -> (Path, (Int, Int)) {
    if self.isPathFinished() {
        throw GameError.gameOver
    }

    let tmpPath: Path = Path()
    var tmpNextPlace: (Int, Int) = self.nextPlace
    var u: Int, v: Int

    tmpPath.items = [self.path.items.last!]

    (u, v) = tmpNextPlace

    while true {
        let lastOutput: Int = tmpPath.lastOutput()
        var nextTile: Tile

        if u == self.nextPlace.0 && v == self.nextPlace.1 {
            nextTile = tile
        } else {
            nextTile = self.tiles[u][v]
        }

        if !(nextTile is NonEmptyTile) {
            break
        }

        tmpPath.expand(u, v: v, input: nextTile.input(to: lastOutput), output: try nextTile.outputFromNeighbourOutput(from: lastOutput))

        tmpNextPlace = self.findNextPlace(tmpPath, nextPlace: tmpNextPlace)

        if u == tmpNextPlace.0 && v == tmpNextPlace.1 {
            break
        }

        (u, v) = tmpNextPlace
    }

    tmpPath.items.removeFirst()

    return (tmpPath, tmpNextPlace)
}
Counting points
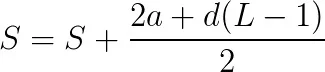
This task is quite simple, compared to the others described above. When a user places a tile, we estimate
the length of a predicted path and add numbers from [1..L] (where L is the length of the predicted path)
to score. This could be expressed as a sum of a finite arithmetic sequence with a step of 1:
The end result
The end result of this coding exercise looks like exactly as the one at the very top of this post:
