ReactJS introduction
Foreword
Last time I wrote an article on how one can encapsulate both HTML and CSS in one entity, called WebComponent. This time I want to tell a bit about how to encapsulate JavaScript and HTML.
When I see an article on Habrahabr titled React something, I think Omg, React again?... But React, just as Ember was always a mystery for me.
Until today.
I've read an awesome article, React.js Introduction For People Who Know Just Enough jQuery To Get By. And now I really see the power of React. Though, I am still planning to play with Angular 2.0 and still remain a fan of Angular, I can tell you for sure, React may help you to raise your level if you are still writing your web-sites with jQuery.
React is a way to make your project consist of a components. So, for example, you have a complex webpage. You may then have a layout, styled in a way to support different themes. Then you may split all its partials into components, so you do not need your layout to hardly rely on its partials.
Although building components with react may seem polluting your code with HTML, it is really great concept to
keep your HTML code near the JS code handling it. React has its own restrictions for the components.
For example, you can not use two tags alongside inside your component. It is required to use
exactly one top-level tag. And all the variables are stored in the state variable.
But I will tell you how to overcome that restriction later.
The architecture
This article relies on JavaScript, so let's be kind and create an initial project structure for a typical JS project. Just like this:
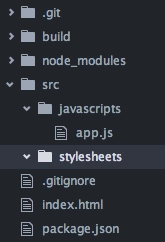
This is always great to have a typical structure for a project so anyone new to the project will not get lost.
So, we can assume we will always have a set of javascripts and stylesheets, used on a front-end. We also may need some third-party libraries, managed by NPM or Bower. And this is always (I mean not javascript projects only) a great idea to have your changes being tracked by some version control system. I like Git the most.
Based on those few assumptions, we will need a folder with javascripts and stylesheets sub-dirs;
.gitignore, package.json and bower.json files (select those you need).
In some cases, like with this article, we may need to compile some of resources. For that purpose we
may create something like build directory. And define the build command in package.json file, within
the scripts section.
A very simple introduction
Preparing layout template
So, let's start writing a layout for our sample webpage. This may be done with Emmet.
Just type html:5 and press Tab within your favorite text editor (I feel comfortable with both
Sublime and Atom, yet you may run Emacs and still use Emmet).
Front-end dependencies
Now, let's add bootstrap and react scripts. The good way of doing it is using bower.
Now there are two ways of adding dependencies with bower: manually editing bower.json or using command-line.
If you decided to add dependencies into bower.json file, remember to set the concrete versions for each dependency.
Or you may face situations, when someone installs your project and uses the newer versions of libraries, which are
incompatible with the code, which uses them.
Here are the lines you will need to add to your bower.json file to proceed:
  "dependencies": {
    // ...
    "react": "0.13.3",
    "bootstrap": "3.3.5"
  }
If you have chosen the CLI way, consider this command:
bower install --save bootstrap reactI preferred the CLI way as it chooses the correct libraries' versions automatically.
Now you may add React's javascript and Bootstrap's CSS into the layout:
  <!DOCTYPE html>
  <html>
    <head>
      <meta charset="utf-8">
      <title>Introduction to ReactJS</title>

      <script src="bower_components/react/react.min.js"></script>

      <link href="bower_components/bootstrap/dist/css/bootstrap.min.css" rel="stylesheet" type="text/css" />
    </head>
    <body>
    </body>
  </html>
First NPM task
You may want to add a task to your package.json to install bower dependencies automatically:
  {
    "dependencies": {
      "bower": "1.4.1"
    }
    "scripts": {
      "bower": "./node_modules/bower/bin/bower install"
    }
  }
This may be useful later, when building a project. Here I used the local version of bower in the script to not make another project requirement of globally installed bower. This approach is used lately in this article for building task.
JSX vs JavaScript
React uses JSX. JSX has two meanings. Accordingly to List of languages that compile to JS, JSX is an extension of JavaScript with human-friendly OOP and type safety support. In the universe of React, JSX is an extension of JavaScript too. But in this case, JSX only allows to create DOM elements from within the code in a DSL-style.
To explain what is DSL-style, I shall show you two examples:
non-DSL way:
  React.createElement("div", {className: "well clearfix"},
    React.createElement("textarea", {className: "form-control", onChange: this.handleChange}),
    React.createElement("br", null),
    React.createElement("button", {className: "btn btn-primary pull-right"}, "Tweet")
  )
DSL way:
  return (
    <div className="well clearfix">
      <textarea className="form-control" onChange={this.handleChange}></textarea>
      <br/>
      <button className="btn btn-primary pull-right">Tweet</button>
    </div>
  );
Both of JSX branches are, again, extensions to JavaScript, thus they need to be compiled to ES5 (also known as
“usual javascript”) to make the code understood by browser. For this purpose we need a compiler.
For React this is called react-tools. So let's add it as a dependency inside our project's package.json file.
This will add the jsx utility to the node_modules sub-dir. So we may define another build task within
the package.json file:
  {
    "scripts": {
      "build": "./node_modules/react-tools/bin/jsx src/javascripts/ build/"
    }
  }
This task compiles all the scripts from the src/javascripts/ directory and stores the compiled javascripts in
build/ directory.
First component
All components are made simply calling React.createClass() method and providing it with a component's rendering
method (a method that returns component's HTML), its initial state (something like Angular's $scope) and
event handlers. Just check it out:
  var TweetBox = React.createClass({
    render: function() {
      return (
        <div className="well clearfix">
          <textarea className="form-control"></textarea>
          <br/>
          <button className="btn btn-primary pull-right">Tweet</button>
        </div>
      );
    }
  });
Here you may see a few restricts, done by React:
- you need **exactly** one top-level tag for your component
- you may not use
classattribute within elements, useclassNameinstead
  React.render(
    <TweetBox />,
    document.body
  );
Note: you may not use the <TweetBox /> tag from within the HTML.
Now let's write that component within the javascripts/app.js file and reference it in the layout,
at the end of <body> tag; to make it loaded when all the document is done loading:
  <!DOCTYPE html>
  <html>
    <head>
      <meta charset="utf-8">
      <title>Introduction to ReactJS</title>

      <script src="bower_components/react/react.min.js"></script>

      <link href="bower_components/bootstrap/dist/css/bootstrap.min.css" rel="stylesheet" type="text/css" />
    </head>
    <body>
      <script src="build/app.js"></script>
    </body>
  </html>
To see the page we've written in action, first compile the sources with npm run build to compile
the JSX code to javascript and use it in the layout template.
State
The component's internals are stored within the state variable. This is something like Angular's $scope.
React adds a method to initialize your component's state, called getInitialState(). It should return object,
representing the initial state. State variables may be accessed via this.state.myVar and interpolated
in template with curly-braces syntax, {this.state.myVar}. So you may do something like this:
  var TweetBox = React.createClass({
    getInitialState: function() {
      return {
        text: "",
        maxLength: 140
      }
    },
    render: function() {
      return (
        <div className="well clearfix">
          <textarea className="form-control"></textarea>
          <br/>
          <span>{ this.state.maxLength - this.state.text.length }</span>
          <button className="btn btn-primary pull-right">Tweet</button>
        </div>
      );
    }
  });
State may be changed with the setState() method, receiving… object! But this time, the object for setState()
represents a set of new field values. So, for example, using syntax
this.setState({ text: "newValue" });will not replace the whole state with text field only. Instead, it will modify text field only and will left
maxLength unchanged.
But when can we call the changeState()? In Angular it is done with data binding. But in React we have
events. Yes-yes, simple DOM events!
So, for example, we may set the onChange event in the <textarea rows="10" cols="50"> and just handle it:
  var TweetBox = React.createClass({
    ...
    handleChange: function(evt) {
      this.setState({ text: evt.target.value });
    },
    render: function() {
      ...
      <textarea className="form-control" onChange={ this.handleChange }>
      ...
    }
Yeah, looks not so pretty as with Angular…
React: conclusion
I assume React's way of doing websites is nice until you learn something better. At least, when switching from jQuery, you can make your webpage's code look much better with React!
Alternatives
Riot
But wait! There are alternatives! Riot continues React experience of state. But makes it with a much more pretty code. But the main advantage of Riot is ES6. Yeah, when both of libraries use compilation, why reject the future and invent a wheel? Thus Riot makes your code much more clear. Check this out:
  <tweet-box>
    <div class="well clearfix">
      <textarea class="form-control" onkeyup={ handleChange }></textarea>
      <br/>
      <span>{ maxLength - text.length }</span>
      <button class="btn btn-primary pull-right">Tweet</button>
    </div>

    <script>
      this.text = "";
      this.maxLength = 140;

      handleChange(evt) {
        this.text = evt.target.value;
      }
    </script>
  </tweet-box>
Everything looks great with Riot: its size is much more lower than React's; it has ES6 and nice syntax; it does not turn your JS code into substance on the edge of two worlds - views layer and logic layer; it has even scoped css!..
But Riot has one huge drawback. That drawback is XHTTPRequest. By default, you may define your components
inline, just within your layout page. But as long as it is a mix of HTML and JS, browser will not correctly
respond to your page, throwing you strange exceptions. So, you may decide to extract your components into separate files.
But here you may face the fact that most of modern browsers do not allow for asynchronous requests to the files
without protocol being provided (so you can not load project files via AJAX while testing project locally).
And that's how Riot loads your components - via AJAX. So you need either to pre-compile your components or
run your project on a web server.
Angular 2.0
Great news for each and every AngularJS fan; the essence of future of web development, Angular.js 2.0. It is made with TypeScript, which is even more powerful than ES6. It provides developers with component architecture - HTML and JS encapsulation, but in even more sophisticated form.
So, for example, our <tweet-box> component in Angular 2.0 may look like this:
tweet-box.ts:
  /// <reference path="../typings/angular2/angular2.d.ts" />
  import {Component, View, bootstrap, formDirectives} from 'angular2/angular2';

  @Component({
    selector: 'tweet-box'
  })
  @View({
    directives: [formDirectives],
    templateUrl: 'src/tweet-box.html'
  })
  class TweetBox {
    text: string;
    maxLength: integer;

    constructor() {
      this.maxLength = 140;
      this.text = '';
    }
  }

  bootstrap(TweetBox);
tweet-box.html:
  <div class="well clearfix">
    <textarea class="form-control" [(ng-model)]="text"></textarea>
    <br/>
    <span>{{ maxLength - text.length }}</span>
    <button class="btn btn-primary pull-right">Tweet</button>
  </div>
Here, as you can see, data binding is used, so there is no more need in event handling. And you can use all the power of TypeScript. But still, the great Angular 2.0 drawbacks are:
- Angular 2.0 is still on the alpha stage (at least, while I am writing this post, it is)
- too much effort is needed to get it working (because of p. 1; still, THREE dependency managers to get it work is way too much…)
- it still needs the server to serve templates or using templates inline
- there are some major differences with all of the other libs referenced here, which may be hard to get used to (for ex., using formDirectories like
[(ng-model)]="modelName")
Fin
Looking at those three libraries, I can tell that Riot made my day. It is as simple as powerful and small. It lacks for two-way data binding, but makes much more sense than React. And yet does not require you to get mad installing all those dependencies to make it work.
All the examples, mentioned in the article are on my GitHub account: